A new approach to measuring black

A ground-breaking new development for the measurement of deep black paints and coatings has been developed as a result of the cooperation between Orion Engineered Carbons, a leading global supplier of carbon black, and BYK-Gardner, worldwide partner of the automotive, paint and plastic industries for quality control of color, appearance and physical properties.
Introduction
Black has become indispensable for automobiles, interior furnishings and many other everyday items. Current reports from various automotive paint manufacturers confirm this trend [1]. For this reason, the reliable and reproducible measurement of black color tones is increasingly important. As a manufacturer of specialty carbon black, Orion has been involved for decades with the characterization of black coatings and the resulting special measurement technology requirements.
Black indices for the objective assessment of black color
For this purpose, Orion, which traces its corporate lineage to Degussa, developed special color indices many years ago for black measurement [2], which have been included in the standardization. In accordance with DIN EN ISO 18314-3, the color properties of a black coating system can be described by the hue-independent blackness value MY (blackness, the absolute contribution of hue dM (undertone), and the hue-dependent blackness value Mc.
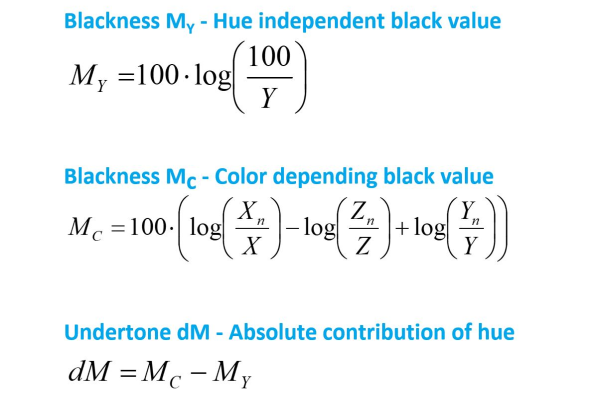
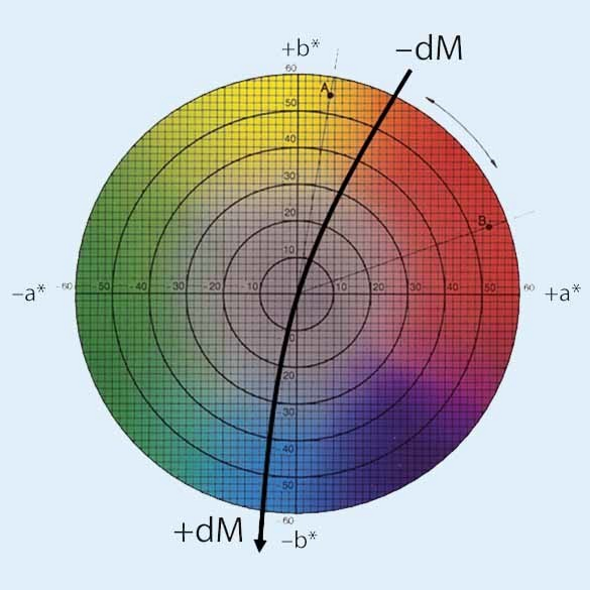
The hue-independent blackness value MY is a measurement of the blackness of a coating (Equation 1). The hue-dependent blackness value Mc (Equation 3) considers the absolute contribution of hue dM (Equation 2). This can be perceived as a blue undertone, if the calculated value of the undertone is positive (dM > 0) or as a brown undertone, if the value is negative (dM < 0). In these equations X, Y, Z are the CIE tristimulus values of the measured sample and Xn, Yn and Zn represent the ideal matt white surface (Xn = 94.811, Yn = 100.000, Zn = 107.304, at D65/10°- conditions).
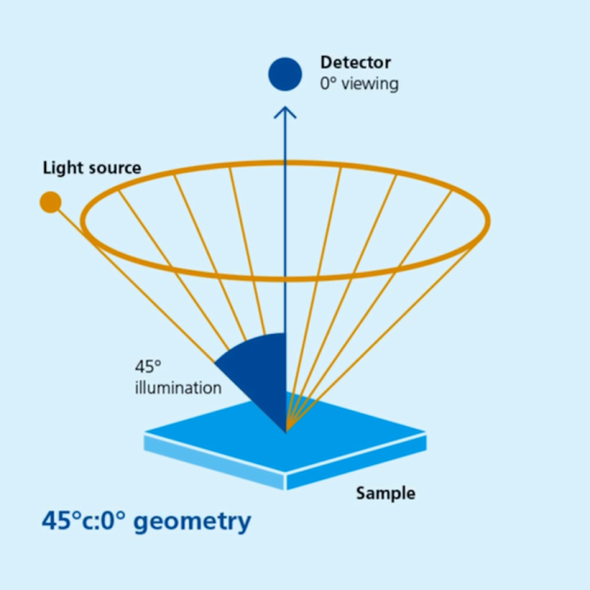
In addition to the use of special indices to describe the coloristic of black coatings, there are also special requirements for the quality and design of spectrophotometers that are suitable for measuring black color tones. According to DIN 5033-10: 2022-03, a measuring instrument with a 45°c:0° measuring geometry is preferable, as this geometry correlates best with visual impression. The calibration of the instrument also plays a significant role, as the resulting reflection is very low for black samples.
Requirements for instrumental color measurement of deep black tones
When checking the quality of carbon black, the color characteristics of the finished coating system are the decisive parameters. Only when this can be measured reproducibly and reliably, it is possible to draw a correct conclusion about the product quality. Particularly in the case of very deep black coatings, the reflection is < 0.5%. The corresponding XYZ tristimulus values are also < 0.5.
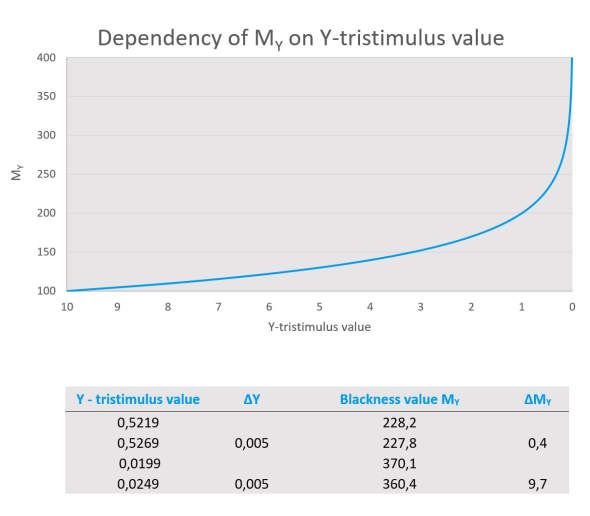
Using the example of Table 1, small deviations in the Y tristimulus value for samples with low color depth only have a minor effect on the resulting MY value. However, this changes for deeply colored samples where the difference is much greater due to the logarithmic dependence of the blackness value MY on the tristimulus value (compared to Figure 1).
This results in a very high repeatability requirement of ≤ ± 0.0005 for the measurement of the tristimulus value Y. If several measuring instruments are being compared to each other, a deviation of the Y tristimulus value of ≤ ± 0.003 is required.
The market's demand for increasingly black paint systems led Orion to develop new, optimised pigments. Orion uses color measuring instruments with 45°c:0° geometry to measure these deep black paint systems. These instruments in use still meet the requirements while operated with conventional light sources. This requires frequent tungsten filament lamp changes so that light intensity remains as constant as possible. The use of LED technology, on the other hand, provides long-term stable light intensity. The goal was to combine this new LED technology with the high demands on measurement accuracy in the area of measuring blackness. Despite an extensive search, no measuring device previously available on the market was able to meet these requirements. In collaboration with Orion, BYK-Gardner took on the challenge of developing an instrument specifically for measuring the deepest black.
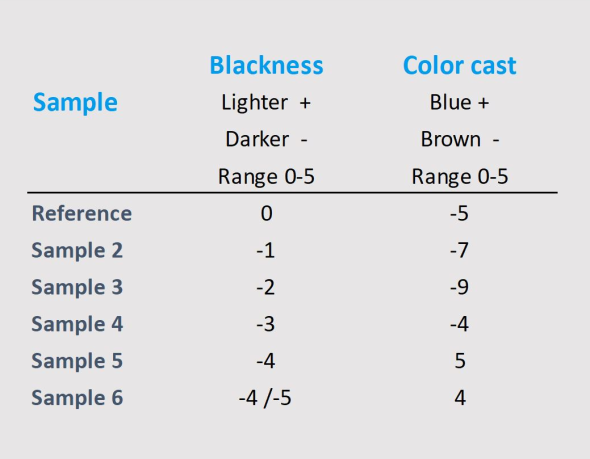
To do this, various pigments were dispersed into a solvent-based paint system and then painted onto 68x68x1mm glass plates, which were provided to BYK-Gardner. The glass plates were special 1mm thin microscopy glass without inherent color. This resulted in six different test plates (Test 1 - Test 6) covering the entire "blackness range" (lower blackness/higher blackness, and blue/brown undertone). The sample material was also checked visually in a light booth under D65 and strong focused light and differences were clearly visible as can be seen in table 2.
New measuring technology breaks the boundaries of color measurement
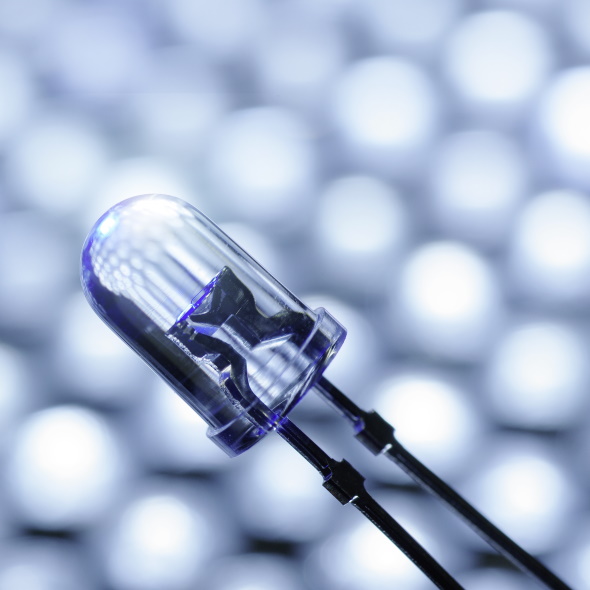
BYK Instruments has been using LEDs as a light source for color measurement for decades. Special production processes transform LEDs from a simple light source into high-performance LEDs, thus guaranteeing exceptional short-term as well as long-term stability. The resulting homogeneous illumination of the measurement area and temperature control of the electronic components specific to each unit ensure highly reproducible results. With a repeatability of 0.01 ΔE* (10 measurements on white) and an outstanding inter-instrument agreement of 0.11 dE94 (individual tolerances for each color for better visual match), digital standards can be used. To measure deepest black with the required repeatability of Y ≤ ± 0.0005 and reproducibility of Y ≤ ± 0.003, the limits of technological feasibility have not only been challenged but expanded with new innovations.
1. Repeatable color measurement at minimum reflection
As previously explained, the reflection of very deep black coatings is < 0.5%. The corresponding XYZ standard color values are also < 0.5. Even marginal thermal noise from electrical components can distort this low signal, thus influencing the measurement result. To improve what is known as the "signal-to-noise ratio," the amplified high-performance LEDs are used with more power over a longer exposure time. The resulting higher light intensity leads to an amplified signal and an excellent signal-to-noise ratio.
2. Black calibration with the “perfect” light trap
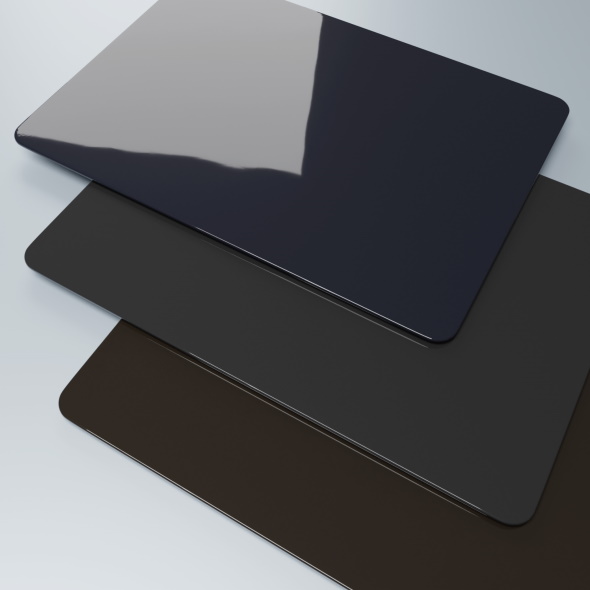
In the absence of perfectly absorbing surfaces, it was common practice in the past to use black glass as the standard for zero calibration. This resulted in scattered light during the measurement of high-gloss samples, however, which was measured in the detector at 0°. To compensate this, the scattered component was determined and subtracted from the subsequent measurements. The result was a limiting lower value for the measuring range that corresponded to the scattering light component.
The optics of the new instrument family have been optimized so that no measurable scattering light occurs. The measurement of the light trap and the black glass standard results in zero. Thus, for high-gloss, deep black samples, only the actual reflection of the coating layer is measured. This results in lower Y and higher MY values, that correspond to both the physical reality and the visual appearance. These further developments mean that only a single black calibration with light trap must be carried out during the production of the measuring device Calibration on a light trap by the customer is not required.
3. Special calibration mode for black
In addition to the usual calibration for color using a white standard, a further calibration for measuring deep black is carried out using a dark grey calibration standard. The grey calibration standard defines the maximum brightness for the black measurement and expands the measuring range for black accordingly. This is done once in the factory during production. Due to the expanded measurement range compared to the “normal” color measurement, the customer must use the enclosed black measurement standards for calibration and checking.
Stable and reproducible black color control
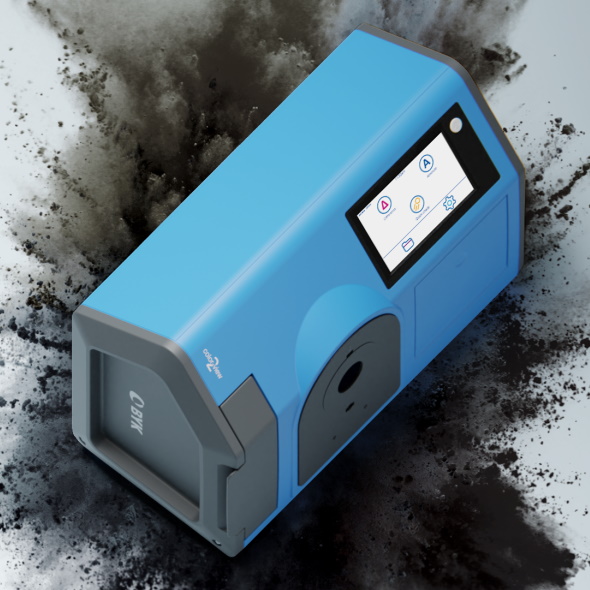
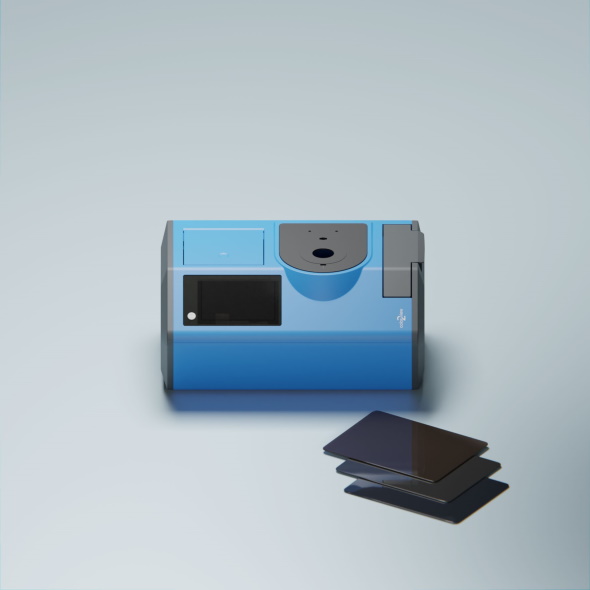
The optimizations described above have been implemented both in a new benchtop instrument and in the existing portable family by means of a new “Jetness Mode.” By activating the corresponding black measurement indices, the instruments automatically switch to the “Jetness Mode” with increased measuring accuracy for deep black. However, not only the measuring instrument, but also the preparation of the test equipment must meet the highest requirements, as even the slightest impurities on the test panels to be measured can lead to significant deviations in the measurement results. Only a very careful, repeated cleaning with distilled water and lint-free laboratory cloths - if necessary, isopropanol in the case of heavy impurities/streaks - enables a correct measurement suitable for checking the modifications. The cleaning result is evaluated by means of an LED flashlight using strong, focused light, as faint streaks cannot be detected under normal/diffused light. Details on sample preparation can be found in the article "Black, the fine details," in the European Coatings Journal. [3] The cleaned samples are tested under laboratory conditions by means of online measurement through 50 immediately successive individual measurements in "Jetness Mode." The results are evaluated in a proprietary data analysis software.
The goal of each spectrophotometer should be to measure what the eye sees. If the measurement results for the hue-independent blackness value MY and the absolute contribution of hue dM from Figure 2 are compared to the visual assessment in Table 2, the results of the new benchtop correlate very well with visual appearance. The measured blackness value increases steadily from Test 1 to Test 6, beginning with an MY of 230 to a maximum MY of approximately 375. Sample Test 5 and Test 6 show a distinct blue undertone with a dM of 16.4 and 12.3, whereas the sample Tests 1 - 4 are in a brown to neutral range.
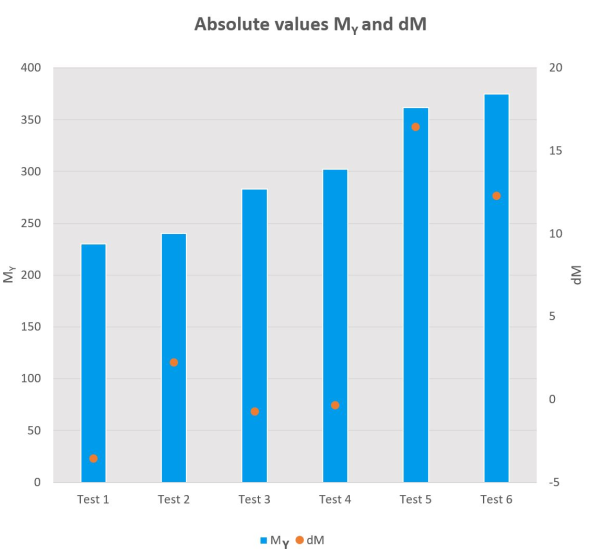
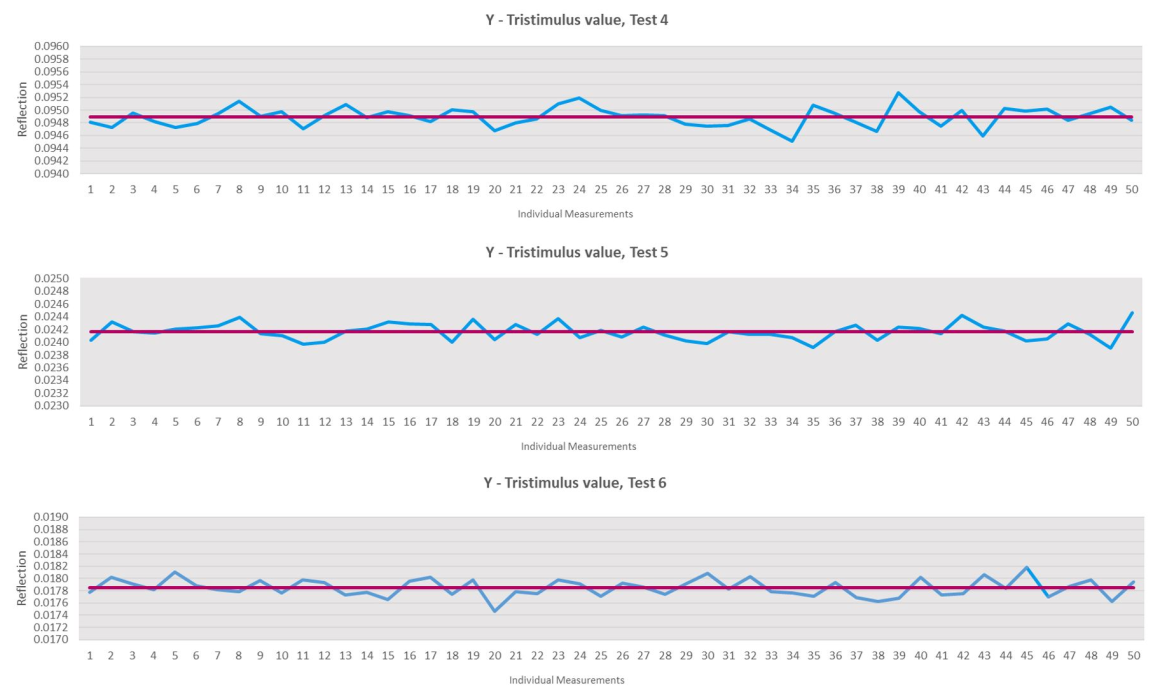
Figure 3 shows the tristimulus value Y of the sample Tests 4 - 6 in 50 individual values each as well as the calculated average value. Although the test specimens for Tests 4 - 6 were deep black samples with an MY > 300 and a reflection of < 0.1 %, the optimized benchtop spectrophotometer showed an unsurpassed repeatability for all three specimens (σ = 0.0001). The very high repeatability requirement of the measurement Y ≤ ± 0.0005 on the part of Orion was unquestionably confirmed in this series of measurements.
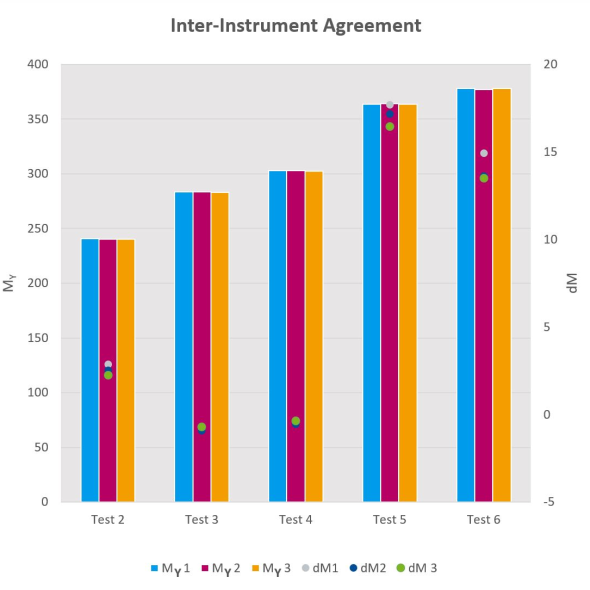
To determine the inter-instrument agreement, the test samples 1 - 6 were tested again with three instruments through 50 immediately successive individual measurements in "Jetness mode". For this purpose, the samples were cleaned before the first measurement, but they remained the same when switching between the instruments in order to rule out deviations due to repeated cleaning. The outstanding reproducibility of all three instruments with regard to the hue-independent blackness value MY shown in Figure 4, can only be achieved through absolutely stable and comparable values for the Y tristimulus value. The deviation was below the required value Y ≤ ± 0.003 for all three tested instruments.
Conclusion
The challenge of measuring deep black colors objectively, repeatedly and reliably has been mastered with the Pro instruments from BYK. Technical performance is outstanding, even with deep black samples with a hue-independent blackness value MY of close to 400. The new, optimized instrument families open completely new perspectives to control color harmony of any color, even deepest blacks, with an unsurpassed accuracy needed for reliable quality control as well as a good correlation to our visual perception. Using the new benchtop spectrophotometer not only enables the reliable measurement of all Specialty Carbon Blacks already available today, but also the ground-breaking new developments in the High-Jetness area in the future.
References
[1] Global Automotive 2021 Color Popularity Report, Axalta Coating Systems, 2021
[2] Lippok-Lohmer, Farbe und Lack 92 (11), 1024 (1986)
[3] Krauß, Farbe und Lack 125 (01), 64-70 (2019)
Authors

Sarah Finder
Orion Engineered Carbons

David Momper
Orion Engineered Carbons

Anita Fehr
BYK-Gardner
October, 2022